


In this article professional photographer, Nadir Khan, gives a selection of tips and tricks to help you get the most out of your photography during the winter climbing season. Simple things that anyone with a camera can do like avoiding underexposure, thinking about body position, using flash and keeping an eye open for photo opportunities when the climbing is over.

Winter is here, the tops of the hills are snow covered and around the country climbers are getting their fitness ready for the total body assault that is winter climbing. But what about capturing those moments of derring do on camera. Whether you're a keen photographer carrying a DSLR or a climber who just wants to get some shots on a compact for your blog, heres some tips to help you get the most out of your camera and capture those moments for your UKC gallery.
Clothing colours
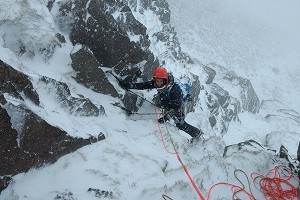
Winter routes will often be on North facing slopes, therefore devoid of direct sunlight for much of the day. The first thing you can do to stack the odds in your favour for getting shots with a bit of impact is making sure the climbers you're with are wearing bright colours. Not just a red jacket, but also think about the beanies, frames of the sunglasses, and if possible avoid black overtrousers. The Europeans are far more adventurous than Brits when it comes to the colours we're prepared to head to the hills in. Clothing companies take note.

© nadir khan
Avoid grey snow
Your camera is designed to give a correct exposure of 18% grey when faced with a white wall, therefore when you photograph a bright snow scene, your camera will try and make it look darker/greyer than it actually is, when it should be whitish ( you will also get reflected colour from the surrounds / sky etc). So, before you set off in the morning, dial in a little +ve exposure compensation to stop the scene being darker than it should be. This also helps keep as much digital information in your image and reduce 'noise ' in the shadows. How much +ve you dial in varies from camera to camera and also how much snow is around but around +1/3 to + 2/3 is about right but check the results on your screen.

© nadir khan
Get to the side
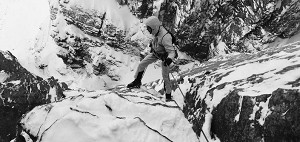
Getting shots from directly below or directly above aren't always the most inspiring, the seat of the pants or the top of a helmet don’t do much to convey the steepness or atmosphere of a route. Where possible, try to get to the side of your route and, if you can leave a little flexibility in your position at the belay so you can move slightly, all the better. Getting to the side also gets you out of the fall line of snow and ice debris. Most compacts have focal lengths from wide to mid zoom. Thats great for getting a lot in your frame but it also has the effect of making routes look less steep which can be depressing when you get your images from what was a gnarl fest look like it was a walk in the park. So, here's a tip. Try and keep your climber facing the edge of the frame that they're closest to, that way, you use the converging verticals to your advantage and you can even make a grade 3 look steep and nasty.
 © nadir khan
 © Nadir Khan
Body position
If you can get to the side of the route or be lucky enough to be climbing alongside another party, then its worth thinking a little about body position and how this conveys drama and action in your image . I try, where possible to have an arm raised, or the axe in profile so you can see the shape of the pic. I also try and have the face in profile or in full, this means the arm away from the camera is raised rather than the arm closest to the camera. Timing the shutter so you catch falling ice or snow can also add to conveying action in an a shot. As a rule of thumb, try and have 3 of the 4 limbs in view, but as with all rules, it's there to be broken some times.
 © Nadir Khan
Using Flash
As we're shooting in the shade, often the background is brighter than our subject. using a bit of flash can help lift your subject out of the shadows and give a bit of pop back to your image. I carry a separate flash unit for these types of shots which is more bulk and weight but also try and experiment a bit with the flash on your camera if it has one. Just be careful that your subject isn't too close to the camera other wise it can be washed out and quite artificial looking.

© Nadir Khan
Portrait shots
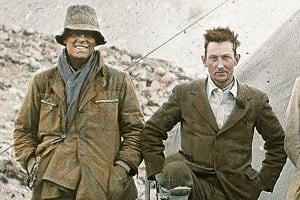
The one thing that shooting in gullies and on cloudy days when you're surrounded by snow is good for is the soft diffused light that it gives. This is great for portrait type images as there are few shadows due to the lack of direct sunlight. Keep an eye on how the light is falling on the climbers face during the day and get some great Facebook profile shots at the belays. Capturing those expressions on climbers faces can often do more to convey the emotions of the day than just images of climbing.

© Nadir Khan
Off Climbing shots
There is an emotional cadenze to a climbing day, the prep, the drive, the walk in, the gearing up, the climb, the descent and then relief at the bar/hut after the day's exploits are over. Part of conveying the overall feel of a day is trying to capture many of those moments. So, dont just get the camera out when you're climbing but try and capture little snippets of all of the aspects of the day. This way, its more of a story and of more interest to non climbers and climbers alike as it brings in a more human element and is also good for filler shots between climbing images. Some of my favourite shots have been taken when the climbings over and we've got back to the hut or on the descent.

© Nadir Khan |

© Nadir Khan |
Lead In Lines
An important aspect of directing the viewer to where you want to focus the attention is the use of lead in lines. These can be subtle and almost subconscious things like spindrift or wind blowing snow across the mountain, or obvious things like the line of a fence or a line of icicles. They help to give depth and dimension to an image and as you're walking into your route or climbing, have half an eye open for opportunities to use natural lead in lines.


Icicles, sustrugi and windblown spindrift and shadows have been used to create lead in lines in these images which helps to focus the direction of the viewers' attention
Rule of Thirds
Most people who take photography seriously have an idea about the rule of thirds, that is dividing the image in the view finder with vertical and horizontal thirds and positioning the main area of focus on the intersection of the lines. But I’m also am happy to ignore it when the composition calls for something different. Its all a matter of personal taste and how best to convey the emotions and feelings that you have in mind when making the image. If you look back at the images above, you’ll see when I’ve used the rule of thirds and when I’ve ignored it.
Practicals
The cold weather saps battery life so carry a spare battery close to your body to keep it warm, especially if you're planning on doing a lot of video work and using live view. Also, depending on the size of the SD / CF card you have , it may be worth carrying a spare. Keep the camera to hand and in a padded protective case, there's no point in keeping it in your rucksack thinking you'll get it out when you're climbing, the best shots may well be when you're not climbing.


So, just a few thoughts that may give you some ideas the next time you're heading out to the hills in winter. Happy shooting and stay safe.
- You can read more about Nadir, and see his amazing photographs on his PHOTOGRAPHY WEBSITE


Comments